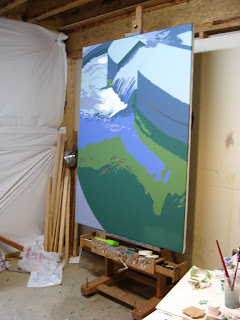
"Untitled" (Study), Polymer on Paper, 17 1/2 x 23 Inches
Jerry Lebo, 2008
The weather is getting better in DC, so I have been able to stroll around during my lunch hour and take a few pictures that I can use as reference material in the studio. I am thankful for my digital camera—not only can I look at the picture right after it is taken—but I can take hundreds of pictures and then simply delete the bad ones. I end up throwing out most of the pictures I take, in any case. In the past, I used to pay to develop a whole roll of film and then throw out the majority of the shots. So I love my digital camera.
Anyway, the above study is one of the paintings I am thinking of making into one of the large “color space” paintings that I have been talking about in my blog recently. The study is based on a photo I took last week when I was walking near the Hirshhorn Museum. I like the unusual composition—and thought it would be a good opportunity to explore various color harmonies.
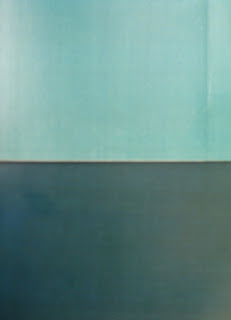
I usually do these sorts of painting studies using acrylics and sometimes oils (I gesso the paper for oils). I really struggled with the color relationships in this study and it took me quite a while to figure out how to get the effect I was after. The reference photo and painting are quite different. I have put the reference photo below so you can see the changes I made—basically I re-worked the entire color harmony in pursuit of what I have been talking about recently—that is, how to evoke a certain psychological response in the viewer using color.
Anyway, the above study is one of the paintings I am thinking of making into one of the large “color space” paintings that I have been talking about in my blog recently. The study is based on a photo I took last week when I was walking near the Hirshhorn Museum. I like the unusual composition—and thought it would be a good opportunity to explore various color harmonies.
I usually do these sorts of painting studies using acrylics and sometimes oils (I gesso the paper for oils). I really struggled with the color relationships in this study and it took me quite a while to figure out how to get the effect I was after. The reference photo and painting are quite different. I have put the reference photo below so you can see the changes I made—basically I re-worked the entire color harmony in pursuit of what I have been talking about recently—that is, how to evoke a certain psychological response in the viewer using color.

One of the problems when moving from a small study to a large painting is that a painting that looks good small—may not look good in a larger format. The reverse also holds true, that a large painting may not be very interesting if painted in a smaller format. You have to decide to “go big” or not based on a smaller studies—and it is not always easy to imagine the effect. Anyway, I am thinking of trying the above painting in a large (50x66 inches) format—what do you think? Send me a comment.
Okay, so let’s get to the point of this post—which is how to use “color references” in the studio. I have increasingly found that I am nearly blind when it comes to color. I know that sounds strange—but the light in my studio is always changing, my mood changes, and even my sight seems to change when I am in the studio. I look at a color at one moment—and it looks greenish—and then two minutes later it looks to have change to a bluish color. I have written about this in some previous posts—but I think color is the hardest part of being an artist. It is such a moving target—even for a trained artist.
One solution I have come to increasingly rely on is the uses of color reference materials. That is, pieces of color that I have lying around my studio—that can serve as a neutral reference point. For example, in just moving from the easel to the palette—sometimes my thoughts about a color change. I might think I have the right color when I am mixing it on the palette—and then get to the canvas and change my mind. So which color is right? The one I was seeing on the palette or the one I have on my brush? It depends, of course, on what color I was after. Which I might have forgotten by the time I am ready to make the stroke—since I am daydreaming about something else most of the time anyway!
Color references don’t need to be expensive or complicated. They can be pieces of paper you paint yourself—or colored paper that you buy. You can use a color matching system—such as Pantone—or make up your own system. Color charts are also a popular way of color referencing—and can be keyed back to the paints you are using. Basically, what you want from a color referencing system is something that you can refer to that is unchanging! Examples of color references that I have used in my own studio include PMS swatches, color-aid paper, and premixed color charts.
The key to using a color reference is to understand what it can—and can’t do. A color reference is not a solution to a problem. It is not a preset color harmony that you can use in a painting (I don’t think this is possible anyway). The benefits of a color reference system in my mind are two. First, it is a tool you can use to work out how colors (and values) will affect each other before you put them onto the canvas. In some ways, this can lead to new color harmonies—but in my experience it can also keep you from mixing the wrong colors or going in circles. Second, and in my mind equally important, color references can be used to bridge the gap between the color you are seeing in your mind and the one you are mixing on the palette. For example, when you think “blue”—what blue are you thinking about. If you can pick out the “blue” you want from a color reference system before you start mixing—then you can more quickly know if you mixed the right color.
If you are not convinced yet—try this experiment. Think about a color you want to use in your paintings. Say, a sky color—or the color of the grass on a sunny day. Next time you are in the studio—try to mix it. Or, better yet, look out the window and mix it based on what you are seeing. Once you have mixed the color, put it aside for the moment. Next, find a piece of paper or other reference material that is as close as possible to the color you are after. You can again compare it directly (by holding it up to the window, for example). Now, mix the color again but with the reference color sitting on your palette. Now go back and compare the color you mixed when you did not have the reference—and the one you mixed when you had the reference nearby. Which is closer to the color you were after? I think you will see my point pretty quickly. Having a neutral reference can get you closer to where you are going--and faster.
I am a strong believer in having as much information around you as possible when you are in the studio. Photos are an accepted material for artists to use. But this is only one form of information—and not a very good one at that! I also am a firm believer in color references. There are numerous ways to use these to improve you paintings—color mixing only being one.
Okay, that’s it for now. Go to the studio and paint. All the best, sixtyminuteartist.